Smart Tech Dryer Humidity Alarm Troubleshooting
Issue: Smart Tech air dryer shutting down or actively in alarm due to a humidity alarm or going in and out of humidity alarm as drying towers are cycling.
Operation: The Smart Tech dryer is constantly measuring the humidity percentage of the dry air being produced. When the humidity measured exceeds 5% the dryer will immediately begin to bypass any air being produced from the system controller vent to prevent any wet air from entering the system as well as starting a 3-minute count down timer before the dryer will shut itself down.
Troubleshooting Steps:
- Humidity percentages 5-25% usually indicate legitimately wet air.
- Over 25% typically indicates a plugged tube feeding dry air to the sensor.
- 99% humidity reading indicates a damaged sensor board or sensor requiring sensor board replacement.
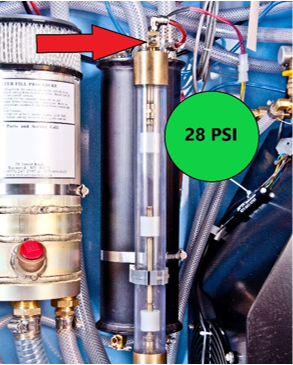
Verify System Pressure
Check dryer system pressure. ST model dryers operate at 28 PSI system pressure. Operating the dryer at a system pressure lower than normal can result in a humidity issue. If the pressure reads correctly on the display-verify the pressure being displayed is correct by measuring with a test gauge on the top of the water sight tube assembly and compare. If the system pressure is less than 28 PSI then raise the pressure up to 29-30PSI and allow the dryer to run until the humidity percentage drops. Reset pressure to 28PSI once the unit is no longer in alarm.
Verify Purge Valve Operation
Verify the purge valve cycle timing. The ST dryers operate on a 27/3 cycle. One purge valve will be energized and open for 27 seconds, the valve will then close and there will be a 3 second dwell time where both valves are closed to allow the empty dry tower to refill with air followed by the other purge valve energizing and opening for 27 seconds.
During the 3 second dwell time before each valve switches you will normally hear an increase of air being bypassed followed by a pop sound as the drying towers switch. You should hear this pop sound of the purge valve cycle happen every 30 seconds.

If you are not hearing this cycling every 30 seconds generally there are two primary possible failures. The first failure is the valve has mechanically worn to the point where it no longer operates. In this case installing a purge valve repair kit in each of the purge valves is advised. The second failure mode is a damaged sensor board in the dryer which controls the purge valve timing and energizes the purge valves. If this has failed, board replacement is required.
It is possible to test if a valve coil is being energized without any special equipment by using something ferrous like a screwdriver and laying it over the top of the solenoid coil. When the coil is energized you should be able to feel a slight magnetic pull. If one coil remains energized the entire time, then the sensor board is faulty. If one valve activates normally but the other valve does not energize it can be a sensor board failure or a faulty coil.
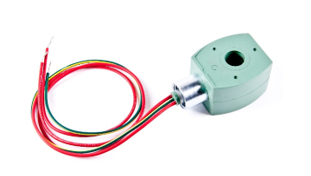
The coil can be tested by disconnecting the two red power wires and measuring the resistance of the coil itself using a multi-meter. You should measure somewhere between 180-350 ohms depending on the dryer model. A coil that is faulty will read open or a very high resistance.
Corrective Action
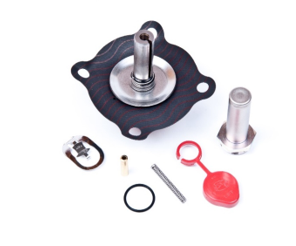
One of the first steps that should be taken when you encounter a humidity alarm issue is to install purge valve repair kits. It is recommended to install the purge valve repair kits once every 2 years. Even if the valves appear to be operating correctly most parts will not fail catastrophically but will gradually wear until an issue arises and a valve that may initially appear to be working correctly is not always fully functional.
If a humidity alarm issue has suddenly arisen following installing a purge valve repair kit then it is advised to take them back apart again and reinspect the purge valve to ensure everything was installed correctly and that there is not a premature failure on the replacement parts.
After any corrective action has been taken such as installing purge valve repair kits or making system pressure adjustments, the dryer will need to run for some time to allow for the drypak to be able to begin drying itself back out again. Because the dryer will shut itself off after 3 minutes of being in a humidity alarm condition it is often necessary to switch the dryer to manual operation mode and put a check mark next to HUMIDITY in the menu that comes up on the display when the toggle switch is flipped. This will allow the dryer to continue to run even with an active humidity alarm. Once the humidity percentage has dropped below 5% and the dryer no longer goes into alarm return it to normal operating mode.
If the humidity percentage readout on the display is over 25% but less than 99% this can indicate a plugged metering tube that feeds a dry air sample over the humidity sensor. The tube has a zip tie on the outside of it at one end to indicate the placement of the orifice that is inside of the tube. The purpose of the orifice is to restrict the airflow down to only the small amount needed for the sensor to work.
Over time this orifice can become plugged, and the sensor no longer receives enough dry air sample causing it to start detecting the ambient humidity in the surrounding environment. You can remove the tube from the sensor board elbow and you should feel a very small amount of air from the end of the tube. If you believe the tube may be plugged it can be replaced temporarily with a section of regular ¼” tube to test the theory. Alternatively, you can switch the tube out with one from a known working dryer.
5500,11,000,16,500 Metering Tube P/N 105212
22,000 & 33,000 Metering Tube P/N 105213
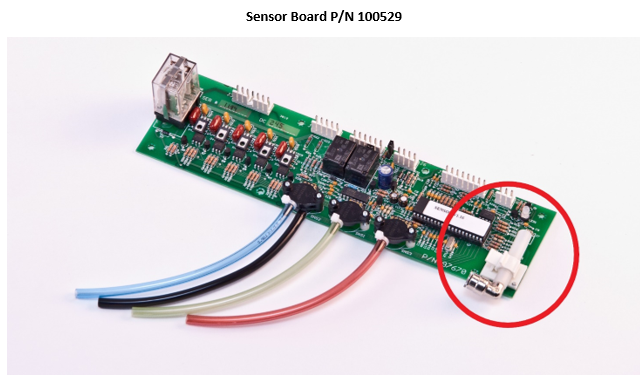
If the humidity percentage displayed on the dryer is 99% this indicates that the humidity sensor or the sensor board are damaged and require replacement. If you experience a failure and observe water or corrosion on the sensor board where the humidity sensor is located (circled red) then use caution when installing a replacement board to ensure no water that may still be existing in the system gets onto the new board. Disassemble and blow out all tubing associated with the sensor and ensure that there is no water present at the top output side of the drypak.
If the issue has not been resolved using the troubleshooting steps explained in this guide call Dielectric technical support for further troubleshooting.
If possible, measure and record pressure readings on each of the two Schrader test points on the top of the drying cylinders before calling. This pressure reading can indicate dryer function and is helpful for more in depth troubleshooting. Keep the test gauge on each test point for a full 1-minute cycle. For 30 seconds you should normally measure just under the displayed system pressure. After the purge valves switch, the pressure will then drop to a low number between 0.25 and 1.75PSI depending on the model. Record these pressure readings for each drying tower as well as noting the dryer system pressure while the measurements are being taken.