PCM Manager for mobile devices
Available from the Radiodetection website, PCM Manager for mobile devices is a companion application for PCMx receivers. It enables live graphing of survey results, Walk Forward and Walk Back features. It can also be used to collect location data from compatible GPS devices. After installing the software on your mobile device select the PCM Manager icon.

Android v1.03 (Android 4.3 and onward)
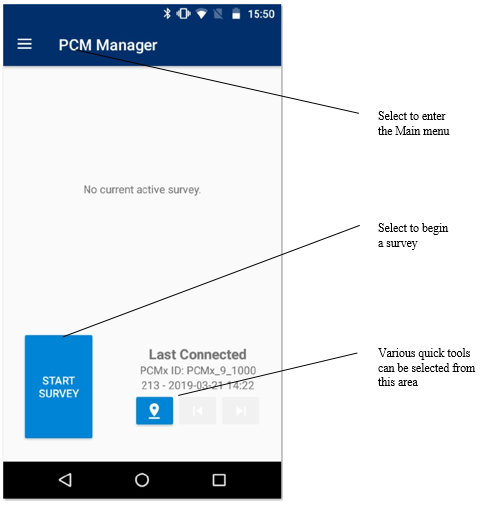
Home Screen and Main Menu
This is the Home Screen, from here you can navigate around the app along with starting surveys.
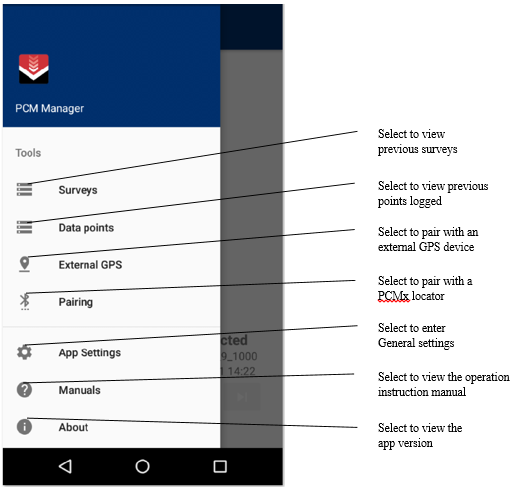
Main Menu
Setting the Bluetooth Protocol on the locator
- On the locator, Press the
 key to enter the menu.
- Scroll to the BT menu using the
 or
or  keys.
keys.
- Press the
 key to enter the BT menu.
- Scroll up or down to the ASCII menu.
- Press thekey to enter the ASCII menu.
- Scroll up or down to select either ASCII 1 or ASCII 2 option.
- Press the
 key to come out of the menu and back to the main locate screen.
Pairing the locator to your Android device
1. ON your Android device Settings ensure Bluetooth is switched on.
2. Launch the PCM Manager app and choose the Menu option  on the top left.
3. Select Pairing from the dropdown menu.
On the locator
4. On the locator, Press the key to enter the menu.
5. Scroll to the BT menu using the or keys.
6. Press the key to enter the BT menu.
7. Scroll up or down to the PAIR menu.
8. Press thekey to enter the PAIR menu.
9. Scroll up or down to the BT-PC option.
To complete the pairing process.
10. On the app, Press “SCAN FOR LOCATORS” This will search for local broadcasting devices and On the PCMx receiver press thekey to initiate pairing.
If at first the device doesn’t appear, please try again, the PCM can be quite slow to appear.
The name of the device will appear underneath Bluetooth Devices Found.
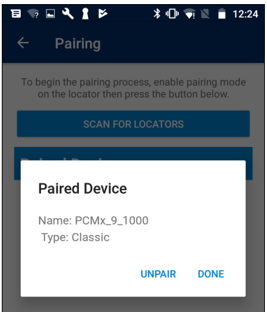
11. Once the app has found a PCM, select it from the list, this will prompt the user to put in the pairing code (1234). If successful, you will be greeted with a message and the PCM should pair in a few seconds. The device name will now appear under Paired Devices.
To un-pair, select an already paired PCM and select UNPAIR from the dialog option. This will prevent further connection until it is paired again.
Setting the GPS option
The PCMx locator has built in GPS or you may prefer to use an external GPS device.
To set the Internal GPS on the locator
- On the locator, Press the key to enter the menu.
- Scroll to the GPS menu using the or keys.
- Press the key to enter the GPS menu.
- Scroll up or down to INT.
- Press the key to come out of the menu, The locator will briefly display OK
- Press the key to come out of the menu and back to the main locate screen.
External GPS
One of the added benefits of PCM manager is the ability to pair an external GPS device to the app, which will in turn supplement the data from the PCM. To begin, we assume the external GPS device is already paired to your phone through whatever means the manufacturer requires.
NOTE: For the external GPS to work, we require NMEA export to be in the GGA format.
Begin by selecting “CONNECT TO…” this will then ask for the user to select paired external GPS device from the shown list. If the user selects an incompatible device, they will be alerted. If the user successfully connects to the external GPS, the current data being transmit will be shown. From here on, all data that is transit from the PCM will be supplemented should be in the right time frame.
With this setup, the user can explore other sections of the app and features like the walk forward and walk back are also enhanced using the external GPS. If for whatever reason the user wants to disable the external GPS, selecting the disconnect button on this screen will stop the data transfer.
Starting a Survey
- On the locator, Press the key to enter the menu.
- Scroll to the DATA menu using the or keys.
- Press the key to enter the DATA menu.
- Scroll up or down to the BT-PC menu.
- Press thekey to enter the BT-PC menu.
- Scroll up or down to select either ON.
- Press the key to come out of the menu and back to the main locate screen.
After selecting the START SURVEY button, you will be shown a list of paired PCM devices, if there is no devices shown, ensure you have paired your locator to this device. You are then prompted to input a pipe diameter and an optional name for the survey. Adding a pipe diameter will help with calculations and increasing accuracy of readings.
Now the survey is started, the interface will transition to displaying the CHART, MAP and LIST view, as records are transferred over, they will populate this view.
Selecting the  cog button in the corner of the line chart view will allow users to select from 1 to 2 axis to be drawn on the line chart. The chart can currently support Voltage, 4Hz Current, 4Hz Phase and Depth and Current Loss.
Finishing a survey will clear this view and be accessed from the Survey History menu item.
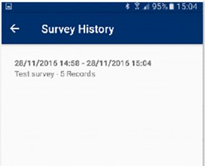
Surveys
This displays a list of finished surveys, showing a quick top level view of what happened during each one. Tapping one of these allows the user to further drill down into the collated data. Long pressing on these surveys gives the user options to share or delete these surveys. This will export the data records in the selected surveys to a CSV file.
Like the dashboard, the line chart here can be also be customised to show various axis from the cog button.
The data in the survey is split into three representations, the chart, the map and the list. These views all show the same data but in different formats. Specific values can be selected from each of the views and all display a popup view with more detail. Sharing and deletion are also possible from this view by long by pressing in the list view.
Data Points
The log history is displayed in this view, it is a collection of all the data points /records sent from PCM locators sorted in time order, the user can delete and share these records  by first long pressing an item and selecting from the menu options displayed.
Data Point Dialog
Throughout the app, selecting a data point  or via the Menu, will display a dialog box.
This dialog box allows users to view more detailed data, a small map preview if available, the ability to walk forward or back to that point using the arrow buttons  , or by swiping to the left allowing the user to add comments.
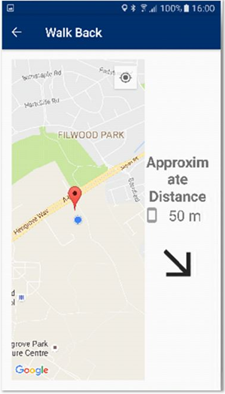
Walk back
Selecting the backward button on a point will show the user where they are in relation to the point, giving them a direction in which they should walk towards and an approximate distance.
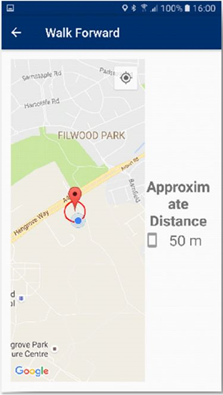
Walk Forward
Similar to walk back, walk forward can help guide the user in showing distance from the original point along with a guide to location where they should take a reading on their settings.
If enabled, the app will sound and vibrate indicating they are at a distance they should think about taking a reading again.
App Settings
The app has various settings that can be tweaked to the needs of the user. The unit type that is displayed to the user can be changed, along with settings that affect the behaviour of the walk forward feature.
To access this feature, Select  ’App Settings’ in the menu screen and then select
 ‘General’.

For more information about the application, select Manuals from the PCM Manager menu or download the manual from www.radiodetection.com/PCMx.