INTRODUCTION
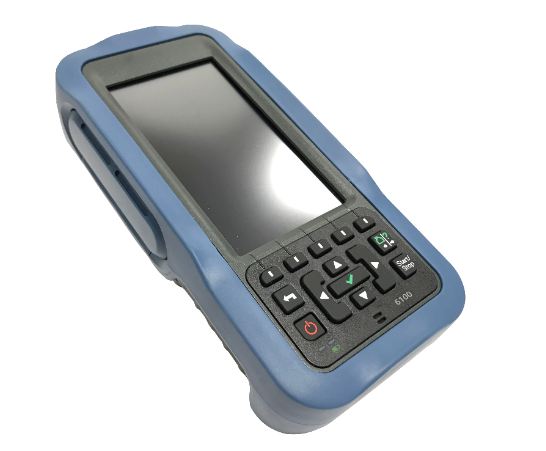
Thank you for purchasing the 6100-Cu Multifunction Phone Network Analyzer and Copper Tester, or 6100-Gfast Multi-play and Copper Test Set.
The purpose of this manual is to provide useful information that will enable users to begin analyzing twisted pair phone networks quickly and efficiently. For more detailed instructions, please refer to the relevant Operation Manuals available at www.radiodetection.com.
CABLE CONNECTIONS
6100-Cu

6100-Gfast and 6100-Gfast-Bond

GETTING STARTED WITH THE 6100
Working with the keypad
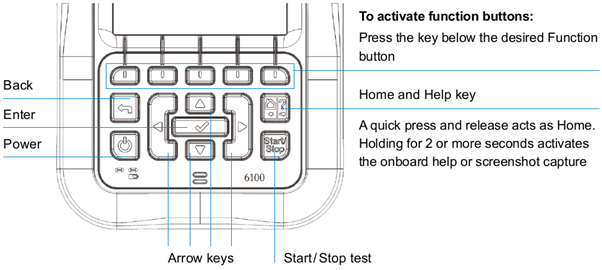
Note: Any reference to pushing buttons on the keypad can be replaced in most cases by clicking/tapping the touchscreen.
System settings
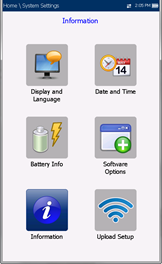
- Display and Language provides the setup for backlight, information on the title bar, language choice, Touchscreen Calibration and enabling screenshots. The Remote Display tab allows you to connect the 6100 to your computer remotely.
- Date and Time sets the date, time, their formats and time zone.
- Battery Info displays battery status and power schemes including Power Save Mode.
- Software Options lists all the Configured Options present on the unit.
- Information shows hardware/software/product information.
- Upload Setup allows you to enable uploading to an FTP server using Wi-Fi or Ethernet and enable in-band DSL FTP upload (Gfast and Gfast-Band only). May require FTPUPLD option.
Note: To change the measurement units (distance and temperature) go to Copper Test / Setup / Application Settings / Standard
WORKING WITH THE 6100
Copper main menu
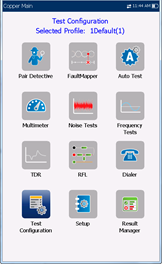
To access the Copper Main Menu:
- From Home, select Copper Test and press √ to open the Copper Main menu page.
- Navigate to each icon using the up/down left/right arrow keys on the keypad.
- Press to run a test, bring up the sub-menu, or perform the application of the selected icon.
- Test Configuration provides the utilities to setup test parameters.
- Setup allows you to configure parameters common to all tests. Set the measurement units within the Standard sub-menu.
- Dialer allows you to place POTS calls using the unit as a telephone (with the built-in speaker or external headset) and the on-screen phone keypad as a dialer. If FED option is enabled, the Dialer icon will appear in the Multimeter menu.
- FED Control is an optional feature. If enabled, the icon appears on the Copper Main The feature tells the test set to detect and control the Teletech TS125 or Viavi UltraFEDTM IIB remote FED (far end device) during testing.
- Result Manager allows you to view, Upload, Export and Delete any of your previously saved test results.
DSL/IP main menu
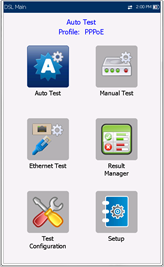
To access the DSL/IP Menu:
From Home, select DSL/IP Test and press √ to open the DSL/IP menu page that allows you to navigate to each icon using the up/down and left/right arrow keys on the keypad. Press √ to access a test or bring up the sub-menu of the selected icon:
- For Auto, Manual or Ethernet, the test will start and the screen control will navigate to the Connection Summary
- Result Manager opens a list of file names previously saved tests, to view, upload, export, or delete results.
- Test Configuration provides the utilities to configure test parameters.
- Setup opens a sub-menu displaying the following:
- Modem Settings allows you to set the display and power parameters of the modem.
- Application Settings allows you to preset the unit with specific DSL measurement values.
- VoIP Phone Book allows you to manage phone numbers relevant to performing VoIP tests.
SETTING UP COPPER TESTS
To setup the Dialer function, from the Copper Main or Multimeter (if FED option enabled) menu, select Dialer and press √. Here you can enter phone numbers for POTS dialing or for entering into the Phone Book, together with an Entry Name.
To select a Test Profile, from the Copper Main menu, select Test Configuration and press √. Here you can Select Profile from one that already exists, as well as Copy and Delete Profiles, and also Reset to the factory default profile.
To Setup parameters common to all tests, from the Copper Main menu, select Setup and press √. Select from the following menu items to setup copper tests:
- Phone Book to setup and save groups of phone numbers.
- Cable Book to select, add, clone and delete a cable, as well as modify its details; and load and save a Cable Book.
- Application Settings to set up and save software settings and values for the cables, using the following pages: General, Standard, Identification, File Name, and Buzzer.
Note: To change the measurement units (distance and temperature) go to Standard and select either ITU, for metric measurements, or ANSI, for US measurements.
The General tab also allows you to configure graph-viewing modes, and Capacitance Measurement allows for 2- or 3-terminal testing.
- Factory Default to revert the Phone Book and/or Application Settings to the factory default values.
- Test Lead Compensation to overwrite the current test lead characteristics and start resistance and capacitance compensation based on the cable temperature of the test lead.
CONFIGURING DSL/IP TESTS (Gfast and Gfast-Bond only)
To setup an AutoTest, Manual Test or Ethernet Test, from the DSL Main pane, select Test Configuration and press √.
- Select Profile Details and press √.
- Select the desired test setup and press √.
- You can configure the test parameters from the setup fields found in Connection Setup, Thresholds and LAN Setup.
- From the Select Tests tab, Enable/Disable the optional sub-tests. When Access Mode is set to IPv6 (DHCP), Ping is the only test available.
- Select the Test Setup tab to configure the following sub-tests (when highlighted): VoIP Test, IPTV Test, Ping, FTP, HTTP, Throughput Test, Traceroute, Web Browser Test.
To create or change a profile to load settings to be read at power up, scroll through and set the options using the up/down and left/right arrow keys on any test setup screen. Then press the back key from any setup screen to display the dialogue box asking you to confirm and save changes.
To select a profile, from the DSL Main pane, select Test Configuration and press √. Then choose Select Profile and press √. A list of available profiles is displayed in a list box.
RUNNING TESTS
To run a copper test, from the Copper Main pane, select the desired test icon, and sub-menu icon in the case of Multimeter, Noise and Frequency Tests, TDR and Auto Test, and press √. The test automatically runs if the Setup/Application Settings - Test Startup Mode is set to Auto. If not, press Start/Stop key to run the test.
To run a DSL/IP test, from the DSL Main pane, select the desired test icon and press √. The test automatically runs. When in the desired test, you can also press the Start/Stop key to run the test.
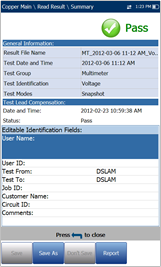
VIEWING TEST RESULTS
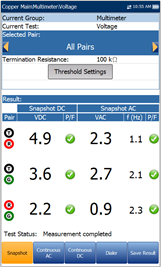
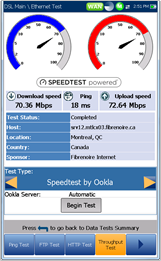
Once a test has run, the results obtained are displayed on the screen. Select from the available tabs to view pass/fail status and results details. See the relevant User Guide or the Operation Manual for details.
SAVING TEST RESULTS
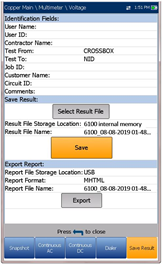
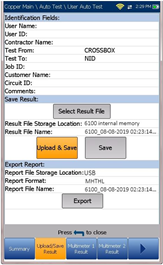
Copper tests: Each copper test includes a Save Result tab that opens a new screen enabling you to save test results to an internal memory file, or to export results to an HTML, MHTML, or XML report using a USB key, during or after a test. Note that User Auto Test includes an Upload/Save Result tab that allows you to upload saved Auto Test results to an FTP site or USB.
To set parameter values and save or export results:
- Press the up/down arrows to select the desired parameter.
- Press the left/right arrow keys to view and select the options
OR
Press √ to open the on-screen keyboard to enter or edit a value.
- Press the up/down left/right arrows to navigate the on-screen keyboard.
- Select the desired function key to complete your selection.
- Select Result File to save your results to an existing File Name or Upload & Save your User AutoTest results to an FTP site or USB
OR
Select Save or Export buttons and press √ to confirm your selection. The file format for exporting results is HTML, MHTML, or XML.
DSL/IP tests: Each DSL/IP test includes an Upload/Save Result tab to Upload & Save your test results; or you can Save your results to an internal memory file; or Export results to an HTML, MHTML, or XML report using a USB key.
To save, upload, or export results:
- Using the up/down arrow keys, select the parameters you want to edit and use the on-screen keyboard.
- Select Result File to save your results to an existing File Name or Upload & Save your results via the following:
- the existing in-band DSL or Ethernet connection made during the test
- an out-band upload connection (Wi-Fi or Ethernet) if enabled and the test is stopped
OR
- Select Save or Export buttons and press √to confirm your selection.
MANAGING SAVED TEST RESULTS
To save, upload, export or delete saved Copper Test results: from the Copper Main pane, select Result Manager. The Results Summary tab allows you to select a File Name and view the result from a list of saved files.
To save, upload, export or delete saved DSL/IP Test results: from the DSL Main pane, select Result Manager. The Result tab allows you to select a File Name and view the results from a list of saved files. You can then access the Upload, Export and Delete tabs.
To save, upload, export or delete saved results: from the Copper Main pane, select Result Manager. The Results Summary tab allows you to select a File Name and view the result from a list of saved files.
You can then view the Summary, Result Details, Profile Details, Phone Book, FED Details, Upload tab, Export tab and the Delete tab.
For additional details, please refer to the User guide or Operation Manual.